Contents
- Introduction
- How do you change the OBS Settings
- Best OBS Setting - The Output Settings Tab
- Best OBS Setting - The Video Settings Tab
- Best OBS Setting - The Audio Settings Tab
- Other important settings which you should take care of
- Useful Plugin to boost your stream to the next level - OWND Pro
Show all chapters
1 Introduction
OBS (Open Broadcaster Software) is the #1 software for streaming and most professional streamers use it. OBS is a very powerful program with a lot of options, but it can be complicated to configure in detail. But don't worry, we're here to show you how to configure OBS Studio in detail. Follow our guide and take your stream quality to the next level.
2 How do you change the OBS Settings
The first time you open OBS the program will help you to configure the default settings. With these settings you will be able to start streaming, but if you want to get the most out of your stream, we advise you to check out some of these settings and modify them.
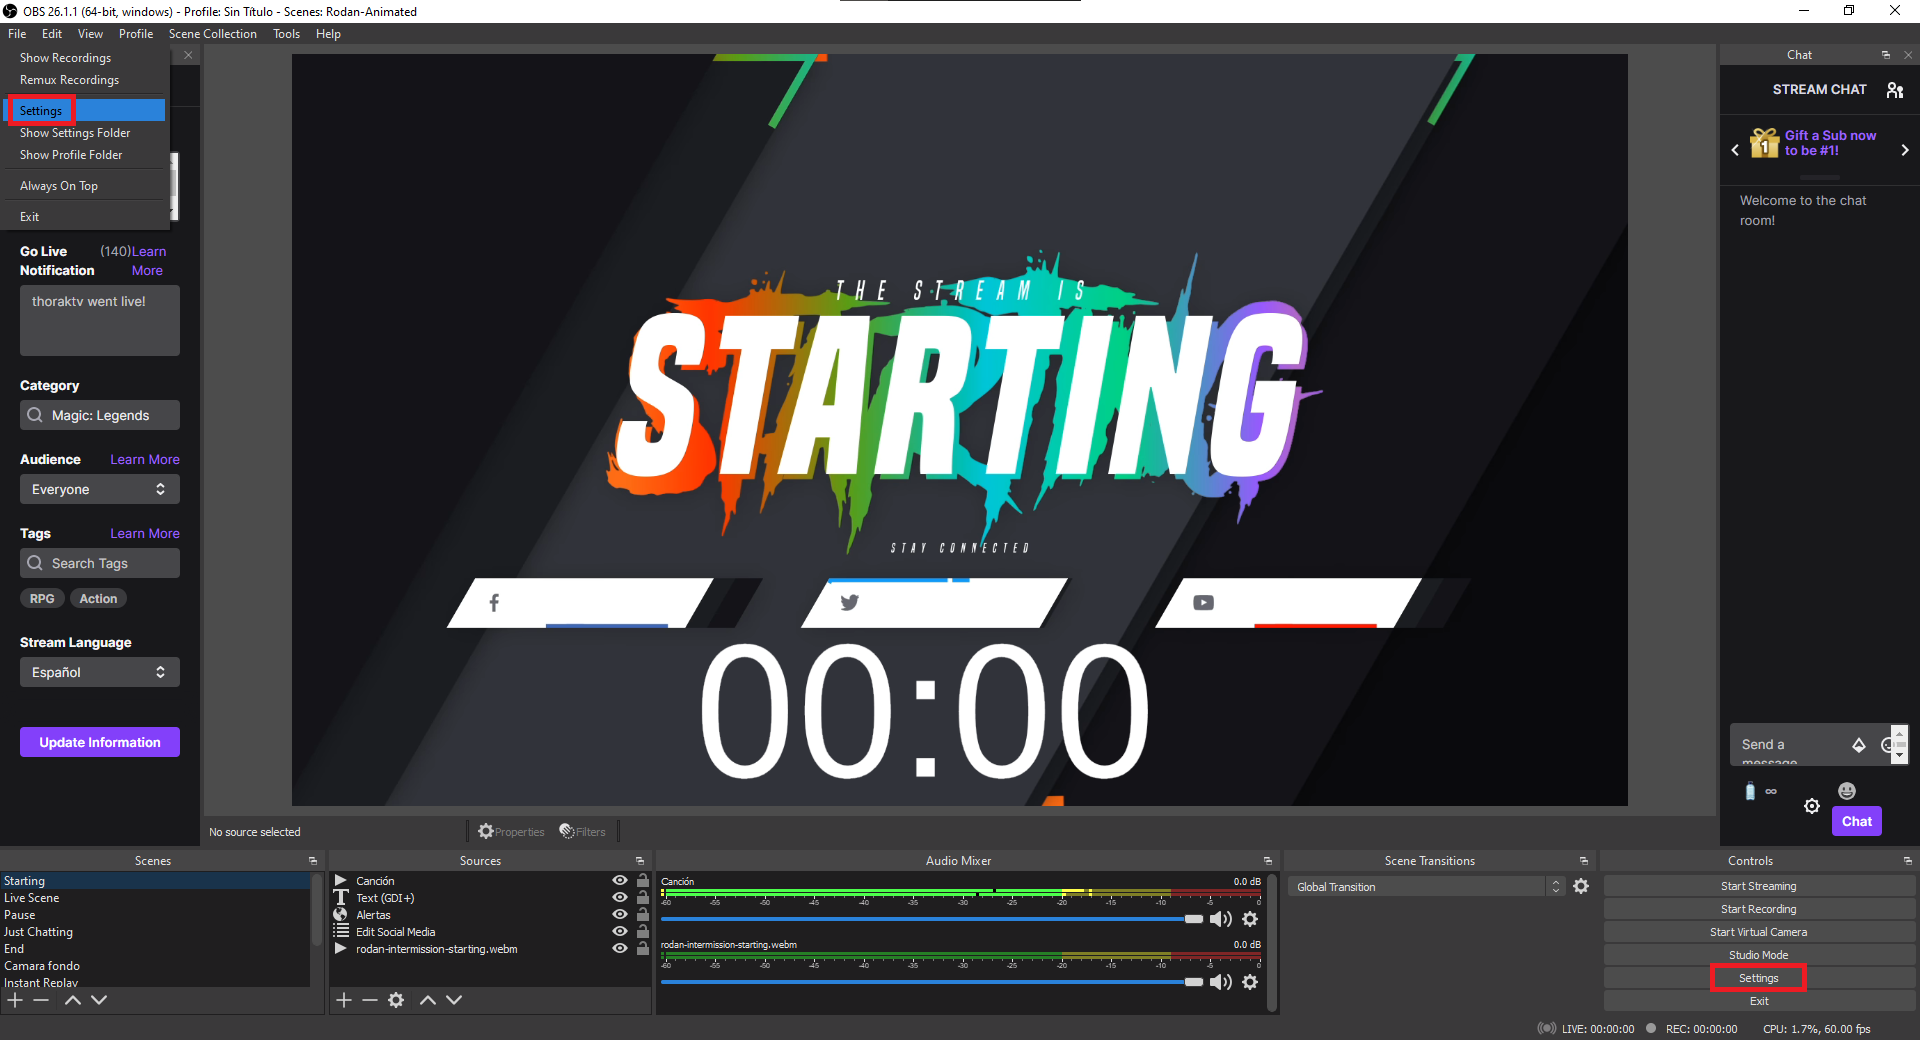
To change the settings of your stream, you can do it in two ways, through File > Settings or by using the button at the bottom right of "Settings", just in the area of the Start Stream and Start Recording buttons. Take a look at the following image and you can't miss it.
3 Best OBS Setting - The Output Settings Tab
The Output Tab of OBS is one of the most important, if not the most important part of the program's settings. From here you can change the quality of your stream and the way your computer works and encodes the images you will broadcast live. These options may seem confusing at first, but don't worry, we are here to tell you what each one does and recommend a configuration. Here we go!
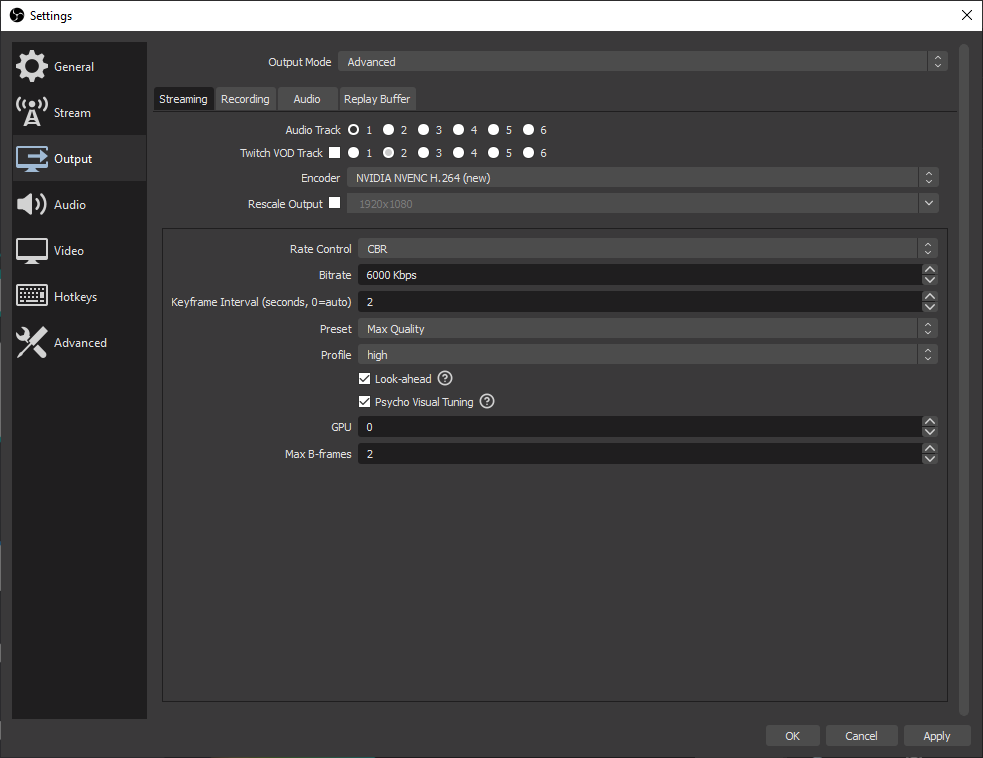
The first thing you should do is select the Advanced mode under Output Mode, at the top of the Output Tab. Now you will see the Streaming, Recording, Audio and Replay Buffer Tabs. In this tutorial we focus on Streaming, both for High-end PCs and Low-end PCs.
Encoder: By default, the encoding of your stream will be done by your CPU, but if you have AMD or Nvidia graphics, it is best to use the hardware encoding option. For Nvidia, it is highly recommended to use the NVENC New encoder. This way you reduce the processor workload without losing much quality. If you want the best video quality, you have to choose x264, but make sure you have a very good CPU or the overall performance will suffer.
Rate Control:This option will determine how consistent the bitrate is. CBR (Constant bitrate) is the most used and recommended method for streaming. In addition, it is the one that gives the best video quality, while keeping the streaming with a constant bitrate. To use this mode, it is highly recommended to use a good internet connection (use VBR if your upload connection is not very good).
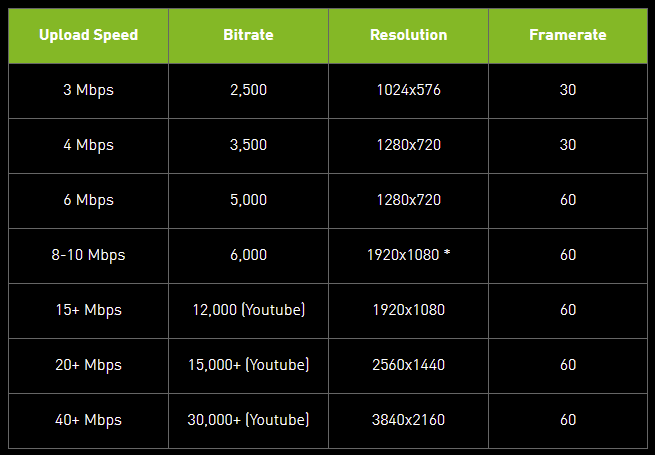
Bitrate: Bitrate is one of the most important parts of this section. It is determined by several variables: Resolution, FPS and connection.
1080p
- Video Bitrate: 6,000Kbps
- Audio Bitrate: 128Kbps
- Resolution: 1920x1080
720p
- Video Bitrate: 3,000Kbps
- Audio Bitrate: 128Kbps
- Resolution: 1280x720
Keyframe Interval: This option tells us that video frames are rendered each X seconds. The best option is 2. Having a keyframe interval of 2 means that it takes at most 2 seconds for the viewers to catch up to a point where they can properly display the feed. If you use 0, OBS will automatically use a 8.5 secs interval and it will take your viewers longer to see what you are streaming. 2 offers a better balance between picture quality and viewer join speed. To understand what a Keyframe Interval is, have you ever pause a movie and see that the frame was blurry? Keyframe Interval makes your frames sharp and fully rendered every 2 seconds, in this case, so your viewers won’t see blurry images and have to wait to see your streaming keyframes fully rendered.
CPU Usage Preset:This option is only available if you use the x264 (CPU) encoding. The slower, the better the video quality, but the more you saturate your CPU. Almost everyone uses "veryfast", which does not sacrifice much CPU and image quality.
Profile: The profile has three options Main, High and Base. The differences lie in the way the stream is rendered. High is the latest and is compatible with newer devices. Main and Base are compatible for older devices, with Base being the worst. This does not affect your stream, but how your followers see your images. Normally leave it on Main or High, as High uses better compression and will give you a better image quality.
Look-ahead and Psycho Visual Tuning:Both options should be enabled, they will give you a better visual quality and performance.
GPU:If you have one GPU, use 0. If you have 2, for example if you are using a laptop, use 1 as it would be the dedicated graphic card in your laptop. This is the GPU that will encode your video, so a dedicated card will always be faster than rendering the streaming with your Intel graphic cards (if you are using a laptop the Intel is the one that comes with your CPU).
Max-B-frames: Always leave this at 2. When you are using a constant bitrate video (CBR), smaller size = better quality. Also, if you are using NVENC or any hardware encoder, the computational increase doesn't matter as long as your computer can keep up with the rendering and you are not losing any FPS.
For x264, selecting a high number in the B-Frames is bad, because there's usually better features to turn on for more benefit and/or less CPU cost. For a hardware encoder, that rule doesn't apply.
1080p High-end PC Best Streaming Settings
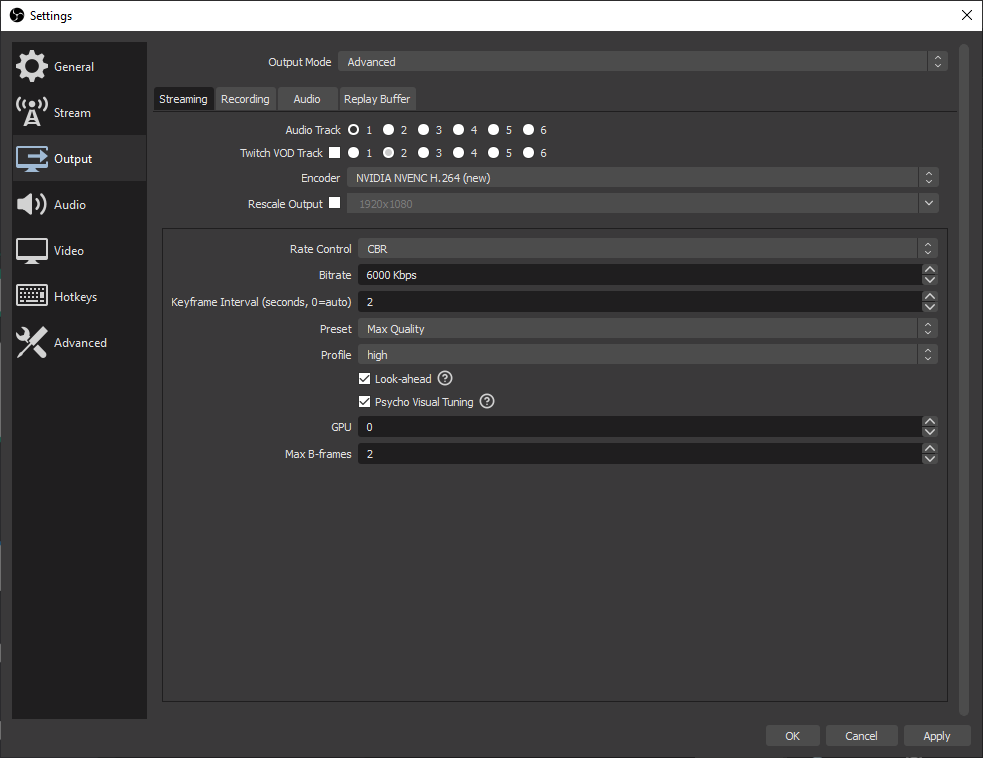
720p Low-End PC Best Streaming Settings
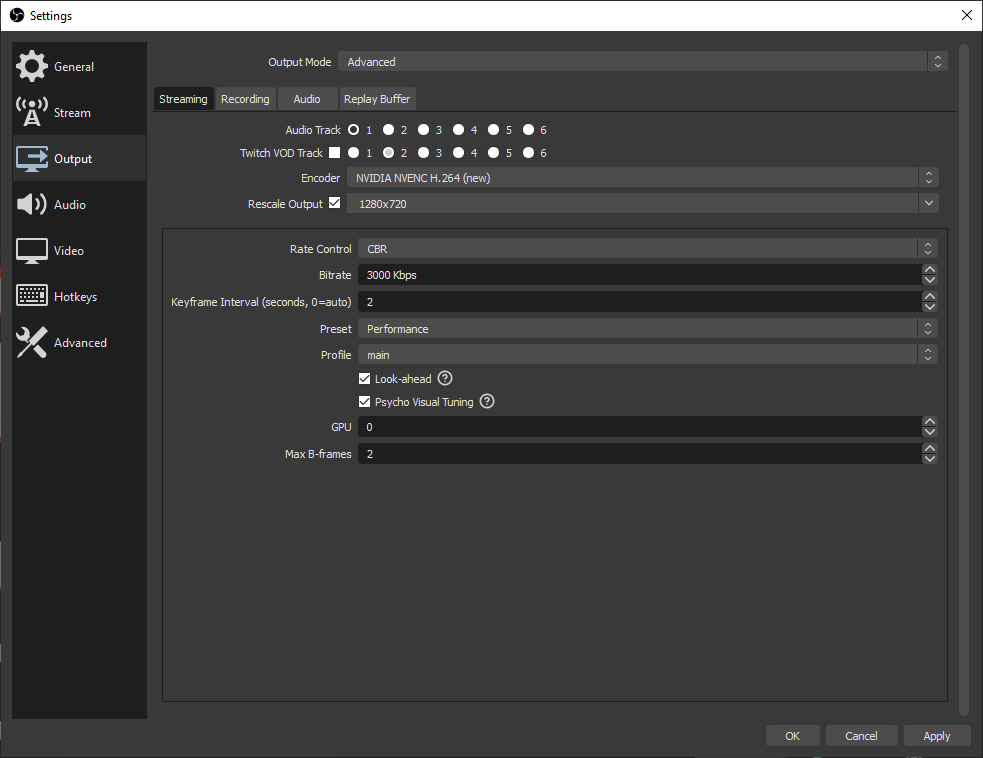 Note: If you use a PC with a NVIDIA GPU choose NVENC encoder, if not, go with x264.
Recording
Not everyone wants to stream his gameplay, maybe you want to record it and then edit it and upload your videos to your YouTube channel or socials. As you can see, inside Output Settings you can modify and configure your Recording Settings. We have just written a tutorial that will let you know which are the best settings for recording your computer, cam and sound with OBS. You can find the Tutorial here: OBS Recording
Audio
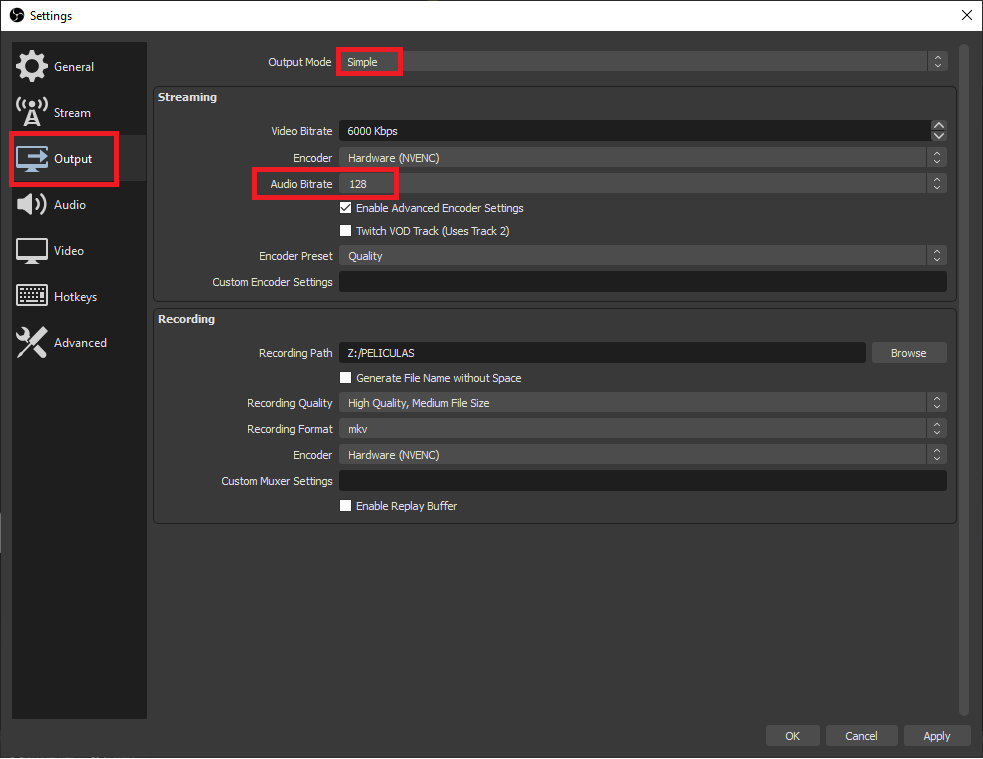
In the Output Tab, if you chose the "Simple" mode, the only thing you will have to configure is the Audio Bitrate, and the maximum you can set is 128. This means the audio you are streaming is 128kbps, more than enough for live streaming. The audio kbps quality affects the bitrate, so you need to be aware of this if your Internet connection isn’t good enough.
If you are using Advanced Output, your Audio Tab will show you up to 8 tracks that you can tag and select. This Tab is extremely useful if you want to record your game sound, mic audio and another source independently.
4 Best OBS Setting - The Video Settings Tab
In the Video Tab, in the Settings, choose the resolution and the FPS with which you will go live. In addition to the bitrate, take into consideration how good and powerful your computer is to decide whether or not you can stream at 1080p or more.
Streaming 1080p 60FPS - Best quality with a high-end PC
If you have a nice PC and you want to record with the best quality, here are the settings with which you get the most out of OBS. This configuration is advised for setups with at least 16GB RAM, i5 7600/Ryzen 5 2600, with a Nvidia GTX 2060 or more.
Open "Settings" and click on "Video":
Base (Canvas) Resolution: Select your monitor resolution, if you have a "2K" monitor select 2560x1440, if your monitor is 1080p, use 1920x1080.
Output (Scaled) Resolution - 1920x1080. This is the video resolution you will be streaming on Twitch, Facebook, Youtube... If you are streaming on Twitch, 1080p is the max. resolution available.
Downscale Filter - Lanczos (36 samples) - This only works if your Base Resolution and your Output Resolution are different.
Common FPS Values - 60 so your recording looks smooth.
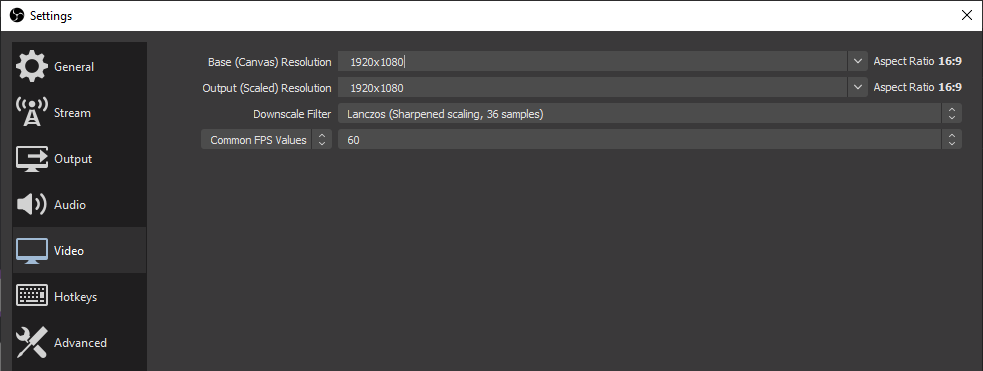
Streaming 720p 30FPS - Best quality with a low-end PC
Not everyone can afford a 2000€ PC, but that doesn't mean you can't stream your gameplay. With these settings you will be able to record videos on almost every laptop from the last 5 years, or a low-end PC. We are talking about a i3, 8GB RAM and a Nvidia GTX970 or equivalent.
Open "Settings" and click on "Video":
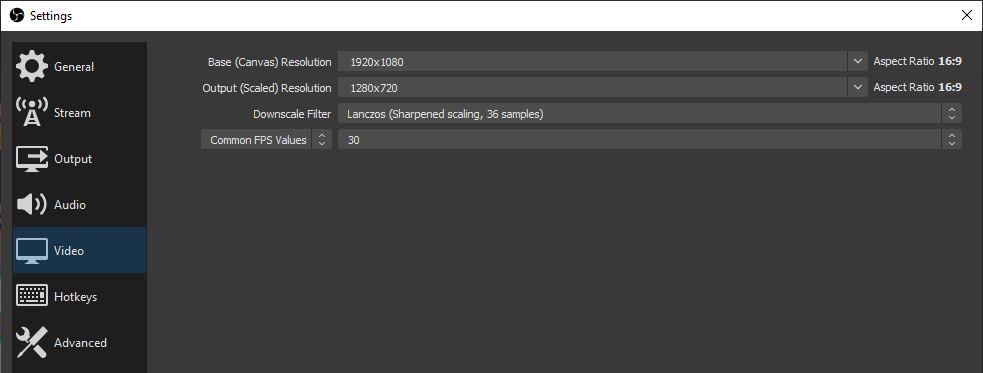
Base (Canvas) Resolution: Select your monitor resolution, if you have a "2K" monitor select 2560x1440, if your monitor is 1080p, use 1920x1080.
Output (Scaled) Resolution - 1280x720. This is the video resolution your streaming will have.
Downscale Filter - Lanczos (36 samples)
Common FPS Values - 30 as it is enough for this resolution. Feel free to test 60FPS and see if your PC can handle it to make the video smoother.
5 Best OBS Setting - The Audio Settings Tab
Besides the output- and video settings, you should also take a closer look at the audio settings to ensure that your stream sounds perfect. Below you can see the best audio options for setting up your stream in OBS.
We will also have to configure the Audio Tab in the settings (Settings > Audio). Here are all the settings to check in order to tell OBS to use your Mic, Headphones, Speakers, external sound card,etc..
Below we explain all the categories and what to select in all of them:
In General:
Sample Rate > 48kHz. The more kHz the better the sound quality. The maximum is 48kHz so choose that.
Channel > Stereo. Here you can select whether you want your sound to be surround, mono or stereo. When streaming, most platforms will allow you to use stereo. This is also the option you should use because Twitch and other streaming platforms convert your audio to Stereo. If you are recording gameplay and you want it to record all the surround audio channels individually, you can, but as soon as you upload the video to YouTube, the audio will be converted to Stereo again.
Global Audio Devices let you pick manually your headphones, speakers or microphones. As you can see, you can add up to 4 Microphones/Auxiliary audio devices.
Desktop Audio > Select your headphones or main speakers. If you have two devices and want your sound coming from both, you can use Desktop Audio 2 too.
Mic/Auxiliary audio > Pick your Mic. As you can see in the below image, I'm using a Blue Snowball Mic as my main microphone.
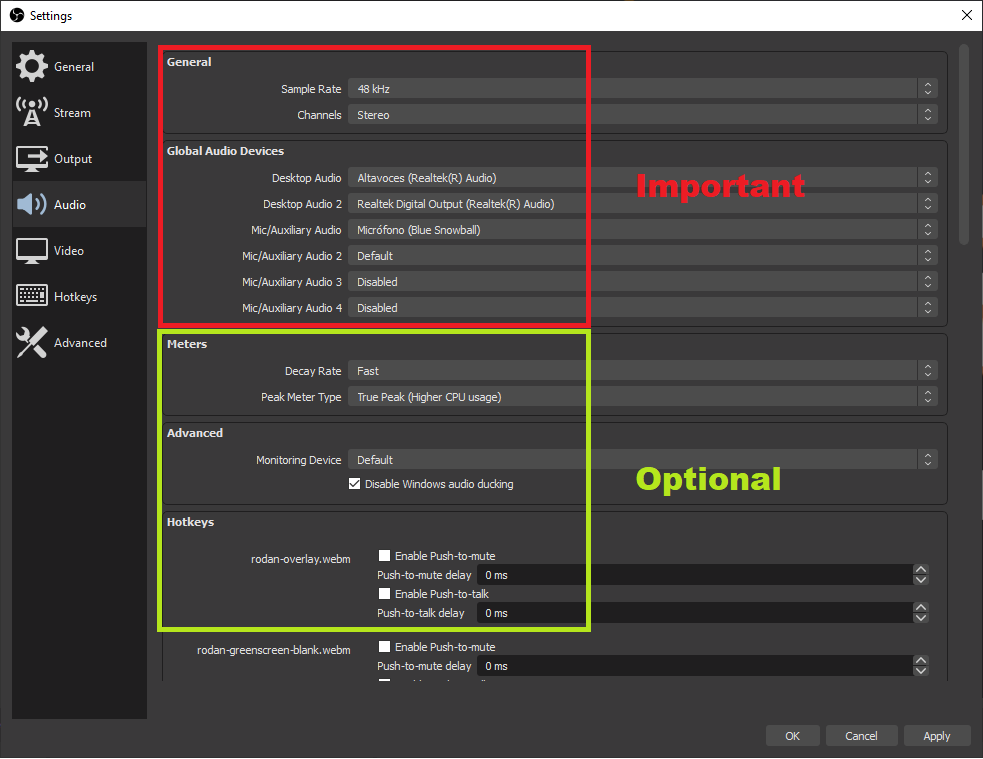
Optional sound settings
If you are using a pair of speakers or external sound card to monitor your streaming, you can go to Advanced > Monitoring Device > and check your preferred device from the list.
"Meters" settings are optional, as they only serve for you to see the green bars in your mixer decaying faster or slower and adjust how precise you want them to be.
At the end of the Audio Settings Tab, you will have the chance to adjust and configure if you want to enable a keyboard key to mute your audio devices. Here you will see listed every audio source in your stream, from your Mic and Desktop audio to the Alert or the overlay sounds.
6 Other important settings which you should take care of
Another important setting that you should be aware of is your internet connection. It may not be in the OBS Settings, but for streaming it is very important to know what internet connection you have as it will directly influence the maximum quality at which you can stream.
Your video and audio settings are directly related to your connection, the better the connection, the more bitrate and quality you can put to your video and audio. An internet connection with an upload speed of 50Mb is sufficient.
You can test your connection speed on sites such as https://www.speedtest.net/.
If your internet is slow, and you still want to stream, our recommendation is to use the OBS Auto Configuration Wizard to determine what settings your connection can support.
7 Useful Plugin to boost your stream to the next level - OWN3D Pro
If you want to take your stream to the next level or you get bored quickly using the same overlay over and over, we have the perfect solution for you. OWN3D PRO is a subscription-based stream graphics service, which constantly adds new overlays, alerts and transitions.
Thanks toOWN3D PROyou can access more than 900 high-quality overlays and alerts, Twitch countdown integration, a donation page, Twitch Chatbot integration, OWN3D Music integration and hundreds of panels for your Twitch channel.
And most importantly, you can use and download the OWN3D PRO OBS Plugin for free with up to 5 free overlays and alerts. To unlock the other awesome features, you will need to subscribe to the premium service.8 OBS Settings - FAQ
What are OBS settings?
OBS settings is where you can configure the platform where you want to stream, the audio/video quality of your stream or where to save your recordings.
Does obs save settings?
Yes, OBS saves all your settings and you can export them to another computer.
Where are obs settings saved?
Windows 10: press WinKey+R and write this: %appdata%\obs-studio
Also, you can open OBS and go to File > Show Settings Folder.
Mac: press Cmd+Shift+G > ~/Library/Application Support/obs-studio/
Linux: ~/.config/obs-studio
What obs settings should i use?
Every PC is different, to know what options to use in OBS, read points 3, 4, 5 and 6 of this tutorial.
How to reset obs settings?
Close OBS. Locate your OBS settings save folder like shown above and erase its content. Next time you open OBS Studio default settings will be up.
How to transfer obs settings to another computer?
Simply copy the content of your Settings folder and paste it into the same folder in your new computer. It is important to install OBS in your new computer before pasting.
What is a profile in obs settings?
The profile groups all your OBS settings and configurations. The profile does not include scenes or sources, but allows you to have different settings for each channel you broadcast on. It is useful to have one profile for streaming and another for recordings.
Jose
Content Creator
A cheerful & funny person with lots of experience in the gaming industry. :)


