Contents
- Introduction
- How to stream on Facebook - Basics
- How to stream on Facebook with your PC and OBS Studio
- How to stream on Facebook with your Console and OBS Studio
- How to stream on Facebook with your Smartphone
- Becoming a Pro Streamer on Facebook
- Frequently asked questions to the topic how to stream on Facebook
1 Introduction
Who doesn't have Facebook? Mark Zuckerberg's social network may be relegated to the background after the arrival of Instagram and TikTok, but the truth is that it has millions of users (and potential viewers).
We know Facebook as this huge social network where we used to share our photos and moments with our friends and family. But for the past years, you can also share your games and gameplay with them. After they took over Mixer, the streaming platform that Microsoft “closed” last year, the numbers are rising and more and more streamers are coming to conquer Facebook Gaming.
In this article we will show you how to start your career as a Facebook streamer - Have fun!

2 How to stream on Facebook - Basics
Since the launch of the platform, a few streamers have given up Twitch and YouTube and went to Facebook Gaming. Same as in Twitch and YouTube, content creators can create and manage a channel on Facebook, but with one peculiarity: here you can also upload photos and videos of your day to day and keep your followers updated in real time.
Thanks to the mobile app, Facebook has also become one of the main platforms for streaming mobile games.
2.1 Requirements to stream on facebook
To be able to stream on Facebook you should consider some things and meet the following requirements:
A Facebook account
Create a creator Facebook page
A computer with enough power to support your stream, a smartphone, tablet or console + video capture card
Internet connection with good speed
A lot of desire to learn and work!
When streaming with your PC on Facebook Gaming, you must remember that your PC must meet some minimum requirements. You need a good processor, a minimum amount of RAM, a dedicated graphics card and a microphone and webcam. You can read more about the necessary hardware, in detail,here.
2.2 Create a Facebook account
As mentioned above, you need a Facebook account and a Creator Facebook page to stream on Facebook. In the following we will show you how to create these two things!
From PC
Create a Facebook account atwww.facebook.com
Enter your name, email or phone number, password, date of birth and gender. Enter a strong password, with multiple characters, uppercase, lowercase and numbers.
Click Create an account.
Finally, you will need to confirm the email address or cell phone number you entered earlier. To confirm the email, click or tap on the link included in the confirmation email. To confirm the phone, you have to type the code you received by SMS in the Confirm box, which will appear when you log in.

From your smartphone
The first thing you will need to do to create a Facebook account is to install the Facebook application on your smartphone. To do this, go to the corresponding app store (App Store for iPhones and Google Play for Android phones), search for the Facebook application and download it.
If you have space problems on your smartphone, you can download Facebook Lite (iOS or Android), which is a reduced version of the Facebook app. It takes much less time to install, but retains the same basic functions as the regular app.
Once you have downloaded and installed the app, open it. On the home screen, click on Create Facebook account and go through the following steps.
On the screen that appears next, click Next.
Enter your first and last name.
Enter your date of birth.
Enter your gender.
Enter your mobile number for verification.
Choose a password.
Finally, click on Register and you are done - easy right?
Create your streamer / content creator page and customize it
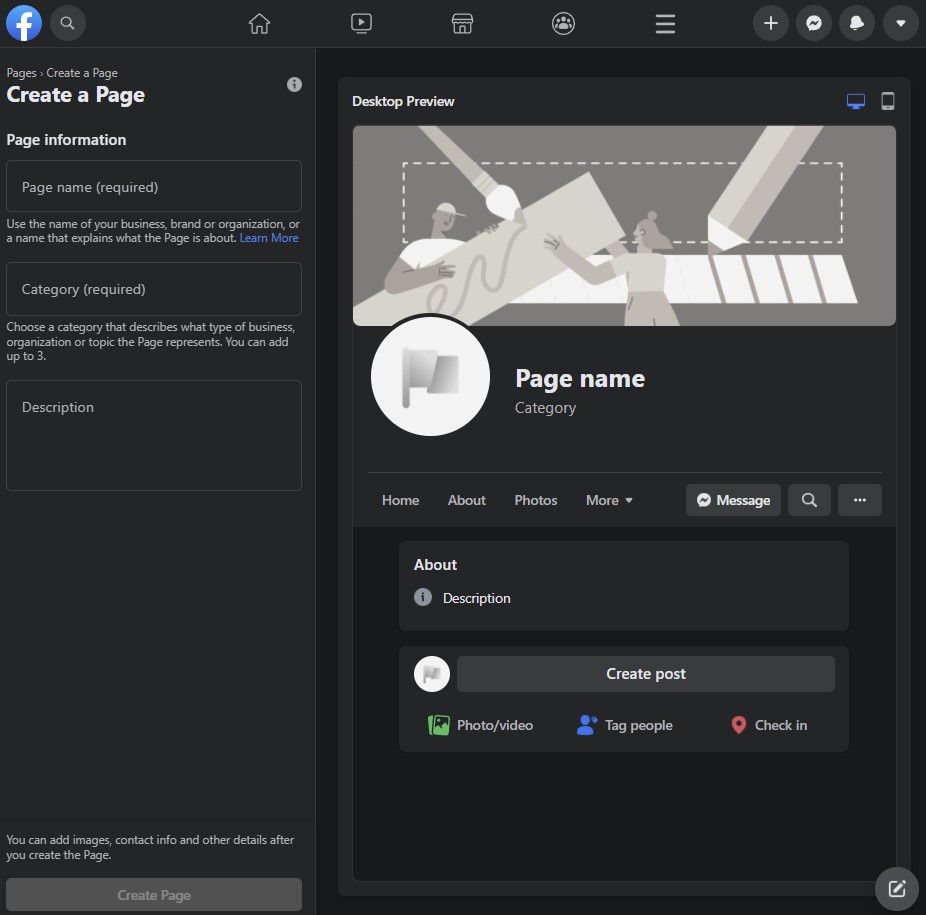
To start streaming games on Facebook, you have to create and configure a creator page. This page is similar to Twitch channels and will allow you to stream and upload content such as photos and videos. You will also be able to select clips, host past streams and post content for your followers.
Go to the Facebook Gaming creator page.
Enter a name for the page.
Select Continue.
Select Upload a profile picture or Skip. Here you can upload your profile picture.
Select Upload a cover photo or Skip. Here you can upload your banner.
If you want to notify your friends and acquaintances, you can do so at this time, otherwise select "Not Now".
The streams will be saved on your creator page, just like Twitch saves your past streams. Viewers will be able to watch them onfb.gg. Your page and your news section will have this custom URL: fb.gg/YourProfileName.

2.3 Choose a suitable streaming software & ensure a consistent design
If you are streaming regularly or once a week, we can't tell you enough how important it is to have a matching design. Your logo, banners, overlay and alerts should have the same style if you want your stream to look professional.
Your channel will attract more viewers and, at the same time, more subscribers. Thanks to the designs we have available in the OWN3D PRO OBS Plugin, you can set up your stream, like a veteran, with just a pair of clicks. You will find more information below, in the point 3.2.
3 How to stream on Facebook with your PC and OBS Studio
At the moment, you have created your own Facebook account and your PC up and running. It is the best time to teach you how to stream on Facebook using your PC and OBS Studio. This is one of the best combinations for streaming games on Facebook Gaming.
OBS is a streaming software that will let you share your gameplay on Facebook within minutes. Easy to set up, easy to configure and very customizable. With OBS you can show your friends and followers your best skills while gaming and also your awesome overlay and alerts.

3.1 Install and set up OBS Studio
Start opening your web browser and entering https://obsproject.com. Choose your client, depending on your OS. You can’t miss the download, as it is visible as soon as you open the website. OBS is supported by Windows, macOS 10.13+ and Linux.
Open the .exe (if you are using Windows) file you've just downloaded and begin the installation process. Click on "Next" until you can select the destination folder and then click "Install". As soon as the installation is finished, click on "Finish" and OBS Studio will start right away.

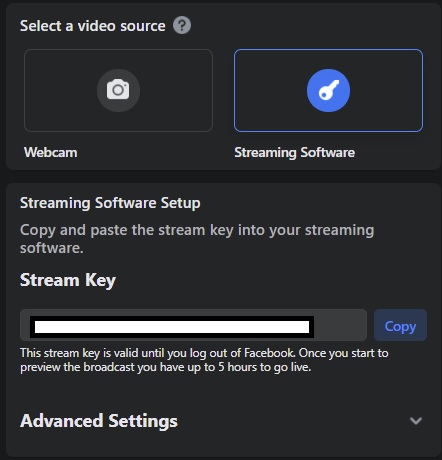
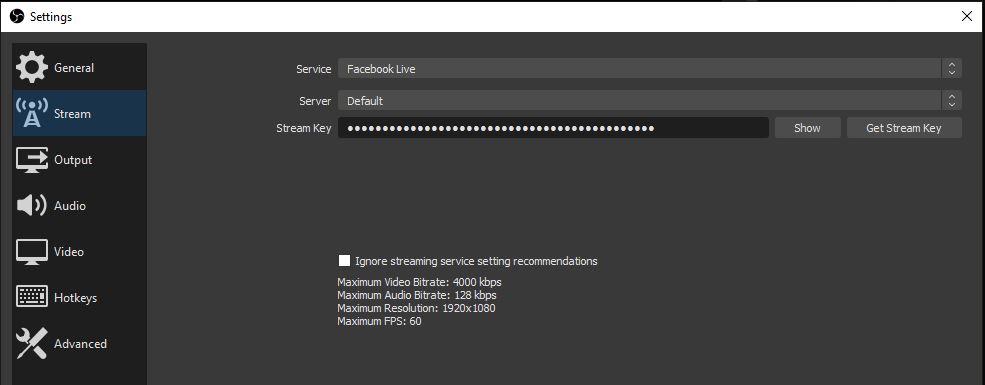
The very first time you open OBS Studio the software will be automatically configured. If you are streaming, click "Optimize for streaming" and click next. If you have a good computer, choose a resolution of 1920x1080 and 60FPS and then choose the streaming platform you want, in this case Facebook. Now you will be asked to connect your Facebook account to OBS, do it and you will be ready to add the sources and scenes to your stream.
You can use just one scene, if you are in a hurry and want to start streaming ASAP, but we recommend you to create a few sources. Add a source so you can share your screen, game or window. Go to the Sources window and click "+", and choose a "Game Capture", "Screen Capture" or "Window Capture".
3.2 Adding design elements using OWN3D Pro
Facebook lets you customize your channel with a banner and a profile pic, so if you want it to look professional, the best thing to do is adding various elements such as an overlay and alerts with the same vibe you have in your profile picture and banner. Maybe you are wondering how you could do this easily, and don’t worry, there is a very easy way to set it all up.
If you want to add an overlay or change your overlay in two clicks, we recommend downloading the OWN3D PRO plugin. Firstly login and create an account on OWN3D PRO (on the "Join Now for Free" button), connect and link your Twitch or OWN3D account and, next, start downloading the plugin here:https://own3d.pro/en/. Don't forget to copy your personal license by clicking on the "Show License Key" button.

Once you have downloaded and installed the OWN3D PRO plugin, go to OBS Studio > "Tools" and open it by clicking the plugin. Then paste your license key when prompted and a window will open with all available overlays and alerts. Click on any overlay that fits your style or mood and click install. Easy, right?
3.3 Start your livestream on Facebook
To start your livestream on Facebook, you have to click the Stream button on the bottom right side of OBS Studio. Before doing so, check all your settings and your streaming preview so everything is perfect: your overlay, alerts, microphone…
4 How to stream on Facebook with your Console and OBS Studio
After having learned how to live stream on Facebook using your PC and OBS, now it's your turn to learn how to stream on Facebook using your PC and your console (with the help of a capture card).
This is the ultimate way to stream on Facebook from consoles, since Facebook has no native application for consoles.
Now, you will learn how to stream on Facebook using your PC and PS4/PS5 or Xbox console.
4.1 Connect your console and computer with a capture card
Now you will learn how to connect your console to your PC using OBS. Please follow this step-by-step guide to stream on Facebook with OBS and your console
Turn on your PC and your PlayStation/Xbox/Nintendo Switch console (dock).
Connect the HDMI from your console to your video capture device.
Connect and set up your microphone, camera, lights, etc....
Open OBS Studio.
Create a "Video Capture Device" source to bring your console gameplay into OBS Studio.
Open the studio mode of OBS Studio and check that everything is in place.
Create and check the overlays.
Check all audio channels (game, music, voice etc.).
Start your game on the console.
Check that the image is OK in your streaming software.
Start your stream!
Disable HDCP
HDCP (High-bandwidth Digital Content Protection) standard is an encryption developed in 2003 for video and audio transmission over DVI or HDMI cables.
There are a few capture cards, mainly old ones, that are not compatible with this standard and therefore will block the signal coming from the console.
If you want to disable HDCP on your console, you have to go to Settings > System > and uncheck HDCP.
4.2 Set up OBS Studio
For setting up your OBS Studio correctly, please go back to point 3.1 where we have already explained it with every detail. For example, there you will learn how to add sources and scenes, a webcam or tuning your microphone.
After that, you want to make sure you have your capture card as a source in OBS Studio. This is the only way OBS will receive your video and audio signal from your console.
For doing this, click on "Sources" and add "+" a source. Now select "Video capture device", name it "Console" and click OK. Next, you will be able to choose the device you want to show, in this case, you will select the video capture device to which your console is connected.
As soon as you see your console image on OBS you can start thinking about adding an overlay and alerts to your streaming. This is one of the best things about streaming your console with the help of a PC and a capture card. Read all about adding overlays and graphics to your stream to make it look professional above, in point 3.2.
4.3 Start your stream on Facebook
If you want to start your Facebook stream now, make sure your console is turned on and connected to your capture device, and the game is loaded. Then click on the "Start stream" button in OBS Studio (bottom right) to start the live stream.

5 How to stream on Facebook with your Smartphone
For a couple of years now, Facebook has been allowing you to do both game and IRL livestreams using only your iOS or Android phone. This option is perfect if you want to do a live stream while you are walking around or traveling somewhere on vacation. In addition, you can also stream your Free Fire, COD: Mobile and Fortnite games.
5.1 Facebook app
The first thing you need to do is download the Facebook app from your cell phone or tablet.
Unlike the YouTube app, you will have to search for the Facebook app in Apple's App Store or Android's Google Play. Open your store and in the search engine type "Facebook". It is important not to confuse the Facebook app with the Facebook Lite app.
Once downloaded and installed, open the app and enter your email and password.
5.2 Setup your Facebook livestream
You are already connected to Facebook and now it's time to set up your stream with the Facebook mobile app.
At the top right, click on the new post icon and select "Live Video" (it's next to the icon of a red video camera with an eye). You can also hit "What's on your mind" and look for the "Live Video" option.
The first time you do this, the Facebook app will ask for permission to use your microphone and camera.
Before starting the live video, select who you want to be able to see your live video. You can do this by clicking on the arrow and in the "To:" section choose the people or groups that can see your live video. If you want everyone to see it, choose "Public". If you want to test it, choose "Only me".
Finally, click on the blue "Start Live Video" button, add a description and enter a short text to let them know what your video is about.
5.3 Start your stream on Facebook
When you have finished entering your description, and want to start your stream, click "Start Live Video". After a few seconds you will see an icon notifying you that you are now Live and you will start to see who is watching your live stream.
When you want to finish, press the "Finish" button. If you then want to share this video on social networks, press the "Share" button and if you want to delete it, press "Delete".
6 Becoming a Pro Streamer on Facebook
Many of the important things you need to be a professional streamer on Facebook are the same as those we have already explained in other articles.
But the truth is that there are also some things you could do that are unique to Facebook. For starters, we recommend that you have a Facebook Gaming page dedicated to you, as a streamer. This page should be as up to date as possible. You can use your channel for streaming and you can (and should) upload photos and videos regularly to interact with your followers.
On the other hand, if you want to stream your life on Facebook you have to be authentic. You should only start streaming if you have the energy and desire to answer comments and interact with your followers/viewers. Don’t rush yourself, because things won’t be perfect from the start, and the most important thing to do while streaming on Facebook is being yourself, making jokes and bringing up interesting conversation topics.
If you want to read more tips and all the details on how to be a professional streamer on Facebook, or on any platform, check out point 6 of the How to stream on YouTube with OBS Studio guide.
7 Frequently asked questions to the topic how to stream on Facebook
How to stream on Facebook using OBS?
For an extensive guide on how to stream on Facebook with OBS, please refer to point 3 in this guide.
How to stream on Facebook gaming?
To stream on Facebook Gaming, you need to create a Facebook account, as well as a page for your channel. The exact steps on how you can do this can be found in this article.
How to stream on Facebook Live?
To stream Facebook Live from your PC with OBS take a look at point 3 of this article. If you want to stream Facebook Live from your smartphone, follow the instructions of point 5.
What do I need to stream on Facebook?
For streaming on Facebook, you will need a PC or a smartphone. You can stream your games from a PC, using OBS, your console (using a PC + Capture card + Console + OBS) and, if you want to do a IRL streaming or stream while you are traveling, you will need a smartphone and Facebook app.
What are the requirements to stream on Facebook?
For streaming on Facebook, you will need a Facebook account, create a Creator page, a PC or a smartphone (with Facebook app installed).
Where to find a live stream on Facebook?
You can find live streams on Facebook here: https://www.facebook.com/watch/live
And if you are looking for game-streams you can find them here: https://www.facebook.com/gaming/video
Can you stream on Facebook and Twitch at the same time?
Yes, you can stream to Facebook and Twitch at the same time with OBS and the plugin called Multiple RTMP. Learn more about it in ourOBS Plugin guide.
How to stream on Facebook and Instagram at the same time?
You can’t stream on Facebook and Instagram, with your phone, at the same time.
How to stream on Facebook with a camera?
You can stream on Facebook with your camera using the Facebook app in your phone, or if using OBS if you are using a PC or Mac. Check out point 3 of this article for more information.
How to stream on Facebook using a phone?
If you want to know how to stream on Facebook using your phone, please take a look at point 5 in this article.
How to stream on Facebook without lag?
Best way to stream on Facebook without lag using your PC is having your PC connected directly to the internet via LAN instead of Wifi.
How to stream on Facebook without delay?
Normally, Facebook has a delay of 15 seconds on their streamings. If you have more delay than 15-20 seconds, and you have no delay configured in your OBS, the problem could be from Facebook itself.
How to stream on Facebook without getting blocked?
If you don’t want to be blocked from streaming on Facebook, you should read the Gaming Community Guidelines: https://www.facebook.com/fbgaminghome/creators/gaming-community-guidelines
Be aware that music will be silenced or even get you blocked. We advise you to only play royalty free music from sources such asOWN3D Music.
Jose
Content Creator
A cheerful & funny person with lots of experience in the gaming industry. :)


