1 Twitch Studio Audio Settings
The versatile streaming tool Twitch Studio was developed directly by Twitch and offers both beginners and streaming professionals many different features that are worth taking a closer look at. The great thing aboutTwitch Studiois that it connects directly to your Twitch account, so it works hand-in-hand with Twitch without necessarily having to use third-party programs. Twitch Studio has a wide range of settings - including the Twitch Studio Audio Settings, which are very important for any stream. Whether it's microphone volume, Twitch Studio Discord audio, or audio filters. The sound settings determine how the stream is received by your viewers and what they ultimately get to hear. In this guide we would like to introduce you to the different Twitch Studio audio settings, explain them to you and show you what is important when setting these settings. Have fun!
2 Twitch Studio Audio Settings - important for a good stream
Besides video and webcam settings, the audio settings in Twitch Studio are essential. If you want to fire off a perfect stream, you will not only impress with a good picture, but also with a high-quality microphone and the corresponding settings. In the end, everything should result in a well-rounded and good overall picture that delights your viewers. The Twitch Studio audio settings are very individual and always depend on the hardware you use. We would like to show you the possible settings and how to use them.
3 Twitch Studio Audio Settings - the menu and the settings
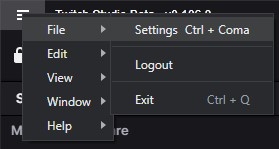
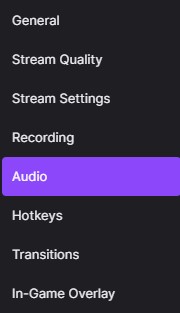
After you have opened Twitch Studio, you can access the settings menu by clicking on the button with the three bars and then selecting File -> Settings. In the menu that has now opened, you will finally find the menu item "Audio". Here you will find all the settings that have to do with your sound.


3.1 Primary microphone

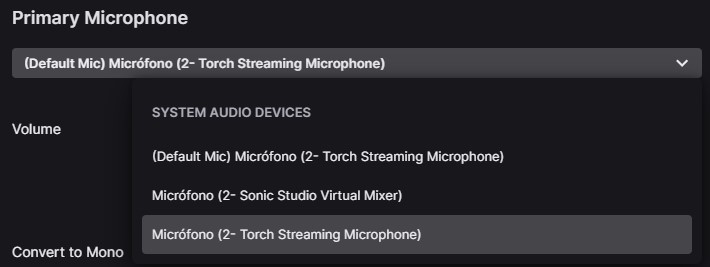
Here you can select which of your connected microphones you want to use as an input device for your stream. Maybe you have a real streaming microphone connected to your PC in addition to your gaming headset and want to use it for your stream. Twitch Studio will always automatically use the microphone that is selected as the default device in Windows. If you want to make user-specific settings in this regard, you can simply open the drop-down menu and select your preferred microphone.
Volume

Set the volume of your microphone here. Basically, you have 2-3 different levels that influence the volume of your microphone. In the Windows settings, on the microphone itself, and directly in Twitch Studio. Therefore, make sure that these adjustments do not collide with each other and that there is a healthy balance. For example, if you turn the microphone level to 50% in Windows, the volume slider on the microphone to 100%, and set the slider to "Too Quiet" in Twitch Studio, the microphone may still be too loud. We recommend you do a little experimenting here to find the perfect microphone volume.
Convert to Mono

On some models, your microphone is recording signals in stereo and only one channel is being played back to the viewer. This means that it could be that the signal from your microphone only reaches your viewers on one earpiece or speaker. Of course, this problem always depends on which microphone you are using and which Windows settings you have chosen - but if this error still occurs, you can usually fix it by enabling this option. Twitch Studio will then convert the stereo signal into a mono signal.
3.2 Name

If you are using Twitch Studio's integrated audio mixer and want to manage different audio sources, it is advisable to give your audio devices different names. This way you will always have a good overview of the different devices and inputs and outputs of your audio setup.
3.3 Do not include this source in clips and & VODs

This option once again shows how Twitch Studio is directly integrated into the Twitch ecosystem and what advantages this integration can have. By default, your streams are saved on Twitch and made available to your viewers as VOD. In case you don't want your audio track in this VOD, Twitch Studio allows you to remove it. This is done in parallel with the stream itself and for this reason, consumes additional bandwidth of your internet line. So if you already have a fairly slow line, we recommend you keep this option disabled to avoid unnecessary lags and poor quality when streaming your stream.
3.4 Audio delay

Especially creators who use a complete audio setup including a mixer and a studio microphone will often use this option. This is because it is not uncommon for there to be asynchrony between the audio and video signals due to the complex processes involved during streaming. For this case, Twitch has thought along and integrated this option into Twitch Studio. So you can set an audio delay and thus perfectly match the microphone signal to the image of your webcam and your gameplay.
3.5 Compressor

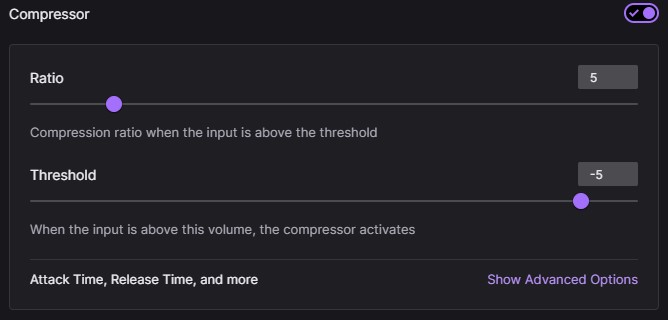
While a few years ago compressors were only available as a hardware variant, nowadays there is the possibility to use software compressors. But what is a compressor? Well, basically you can say that a compressor compresses and adjusts the audio signal. What happens is that the software scans the audio signal in real-time and tries to match the different tones so that there are no annoying spikes or unintelligible murmurs at low volumes. How pronounced this detection and ultimately the conversion should be, you can set in the compressor settings of Twitch Studio. Ratio determines the amount of compression when the signal is above the threshold, while Threshold determines the actual threshold. The ideal settings always depend on what hardware you are using and how loud your microphone is in general.
3.6 Noise Gate

Noise Gate - and that's exactly what it is. If you activate this feature, the signal of your microphone will only be perceived and used for the stream if it has a certain volume. All other sounds are blocked out by this "gate", so to speak. The purpose of this option is to effectively block out various background noises such as conversations in the next room, fan noise from the PC, or the screaming of the neighbor's children. You can set the threshold value when the noise gate should open with the corresponding slider that appears when you have activated the feature.
3.7 Noise reduction

Actually, every microphone has a certain amount of noise. Often, however, this is not audible, since you usually speak into it or the noise is drowned out by the sound of the gameplay. However, if there are quieter parts in the game where hardly any sound is played and you don't say anything, this noise can become audible to the viewer. To counteract this, you can activate the noise reduction function in the Twitch Studio Audio Settings. You can vary the sensitivity of the noise reduction by choosing the different options in the drop-down menu. You can choose between "Low", "High" and "Very High". For automatic noise reduction, you can choose the "Customize" option.
4 Conclusion
In this guide, you have learned all the settings options of the Twitch Studio Audio Settings. Of course, the ideal settings always depend on the hardware and software you use and influence each other. Therefore, it is very difficult to present you with the perfect solution. You should therefore find out the individual Twitch Studio audio settings yourself. With our guide, we have explained the terminology and shown you what is important for a good audio setup. We wish you a lot of fun with streaming!
Maurice
Content Creator
Quality Content right from the heart of a passionate Gamer. :)


